The characteristics of the 4 kinds of shell making processes widely used in the domestic precision casting industry are analyzed and compared. From the comparison of the quality of precision castings, the water glass shell is inferior, followed by the composite shell, silica sol-low temperature wax shell, and silica sol-medium temperature wax shell is the best. From the comparison of shell manufacturing cost, the water glass shell is the lowest, and the silica sol-medium temperature wax shell is the highest. Improvement measures are proposed for these four shell-making processes.
At present, the following 4 kinds of shell making processes are widely used in the production of domestic precision castings:
- A. Water glass shell
- B. Composite shell
- C. Silica sol type shell (low temperature wax);
- D. Silica sol type shell (medium temperature wax). The first 3 schemes all use low-temperature wax (mold).
1. Water Glass Shell
This process has a production history of nearly 50 years in China, and its number of manufacturers still accounts for more than 75% of China’s precision casting manufacturers. Through the unremitting efforts of colleagues in the precision casting industry for half a century, the application and research of the water glass shell technology has reached a very high level.
Over the years, due to the improvement of the refractory material of the back layer shell and the popularization and application of new hardeners, the strength of the water glass shell has doubled. The surface quality, dimensional accuracy and yield of castings have been greatly improved, and they still occupy a large market share, replacing foreign sand castings for export in batches.
Low cost, shortest production cycle, excellent shelling performance and high air permeability are still advantages that any other shell technology can’t match. However, the quality of castings, including surface roughness, number of defects, dimensional accuracy, yield, repair rate, etc., are worse than the other three processes (see Table 1).
2. Composite Shell
In order to overcome the shortcomings of the above-mentioned water glass shells, many factories currently use zircon and mullite-silica sol shells for the first and second layers. The back layer still uses the original water glass shell technology. It is an improved solution that combines the excellent surface quality of the silica gel shell with the advantages of low cost and short cycle time of water glass. Compared with the water glass shell, the surface quality of its castings has been greatly improved, the surface roughness is reduced, the surface defects are reduced, and the repair rate is reduced. It can be applied to high-Alloy steel such as stainless steel and heat-resistant steel. The production cycle is much shorter than that of the low-temperature wax-silica sol shell, which is similar to the water glass shell (Table 1).
3. Silica Sol (Low Temperature Wax) Shell
This process is in line with national conditions, and has greater adaptability and superiority (compared with medium temperature wax) when casting more than 1kg, especially large and medium-sized castings of more than 5kg.
Generally speaking, the quality requirements of medium and large castings, especially the requirements of surface roughness, dimensional accuracy, and form and position tolerances, are not too high. It is not necessary to use high melting point and medium temperature wax. Medium temperature wax requires high pressure (greater than 6-7MPa) or liquid wax pressure injection wax mold, which requires a large investment in equipment. Medium temperature wax thick and large wax molds are easy to shrink, deform, and high cost. Low-temperature wax molding is easy and the equipment is simple, while the surface roughness of the wax mold is not much different.
This process is more stable than the composite shell, especially the dimensional accuracy of the castings. Because it has no water glass, the shell has good high temperature performance, and the shell has high air permeability and strong creep resistance after firing at 1000-1200 ℃ (table 4) It can be used for thin-walled parts and small and medium-sized parts with complex structures, as well as large parts weighing 50-100kg, such as water pumps, impellers, diversion shells, pump bodies, ball valve bodies, valve plates, etc. For thin-walled small or medium-sized pieces or large pieces, fork shells or lifting shells can be used to directly cast in front of the furnace, and a high yield can be obtained.
4. Silica Sol (Medium Temperature Wax) Shell
This is an internationally universal production process for precision castings. It has the highest casting quality and the lowest repair rate. It is especially suitable for small and medium-sized enterprises with high surface roughness requirements (Ra0.8-3.2) and high dimensional accuracy (CT3-CT5 level). Pieces, extra small pieces (2-1000g). However, due to equipment and cost constraints, it is rarely used in medium and large pieces (5-100kg).
According to the structural characteristics and processing difficulties of the cast shell parts, the process is analyzed, the rough datum and the fine datum are correctly selected, the machining allowance is reasonably distributed, the processing problems of the plane and the inner hole are solved, and the parts are finally qualified.
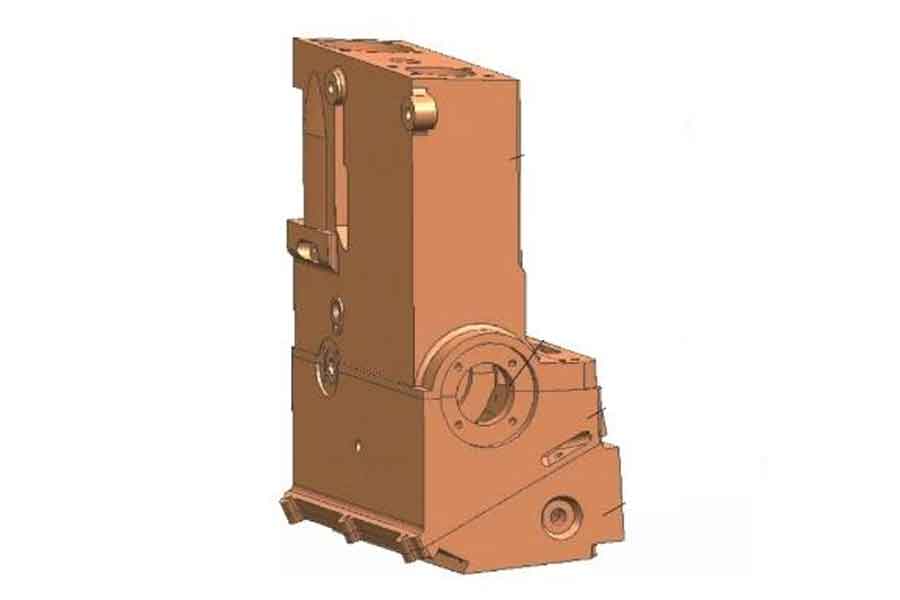
Casting shell parts have complex shapes, many associated dimensions, and high precision. The selection of machining standards is very important. The operating mechanism of a certain type of product is installed in a separable shell. The separable shell is shown in Figure 1. It is composed of No. 1, No. 2 and No. 3 shells.
The No. 2 shell is in the middle position, which plays the role of connecting the upper and the lower. There is the No. 1 shell on the top and the No. 3 shell on the bottom, which is equipped with a number of important parts such as shafts. It can be seen that the No. 2 housing is the reference part during assembly, and its machining accuracy will directly affect the assembly accuracy of the operating mechanism.
1. Technical Requirements For Parts
The blanks of No. 1, No. 2 and No. 3 shells are sand castings, the material is ZL116 Aluminum alloy (T5), and the casting accuracy grade is CT9 (HB 6103—2004).
Shell No. 2 is shown in Figure 2. In order to ensure a close fit with No. 1 and No. 3 housings, both sides A and B are required to have good dimensional accuracy (±0.1mm), geometric tolerance (flatness of 0.05mm) and surface quality (surface roughness value Ra= 1.6μm). At the same time, in order to ensure the positional relationship after assembly, there are also quite high requirements for the positioning holes on both sides of A and B.
The dimensional accuracy of the hole pitch is ±0.05mm, the dimensional accuracy of the hole diameter is H8, and the surface roughness value Ra=1.6μm. For non-positioning holes, such as general mounting holes and threaded holes, the dimensional accuracy has also reached ±0.1mm.
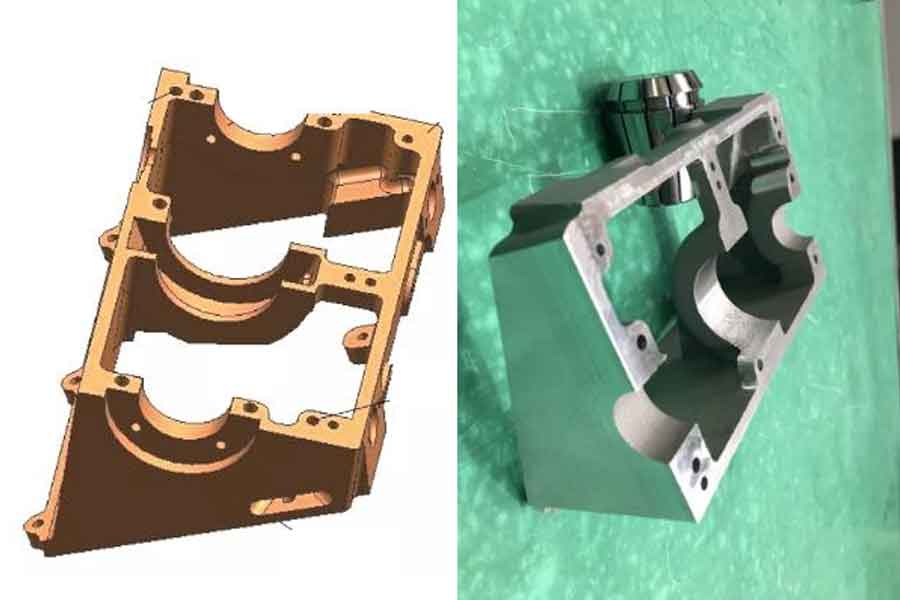
In addition, in order to ensure that the position of the shaft is installed correctly, the machining of the C hole is also very important. The machining accuracy of the hole will directly affect the installation position of the shaft in it and whether the shaft can rotate flexibly.
Through the above analysis, starting from the assembly requirements and use, the mechanical machining of this part mainly includes two aspects: one is machining A and B surfaces and the positioning holes and mounting holes on them; the other is machining C holes.
2. Selection Of Fine Benchmarks
Precise benchmark refers to the machining in the first few procedures to prepare for positioning and clamping for the subsequent procedures. In the subsequent machining, it is used as a benchmark to process other parts. As far as this part is concerned, the selection of side A as the precision datum is mainly due to the following considerations. 1)
The A surface and the two positioning holes on it are the assembly base surface (design reference), which can make the process coincide with the design reference, conform to the principle of “reference overlap”, can reduce the size conversion, and avoid the cause caused by the reference mismatch error. 2) In the subsequent machining, the A surface is used multiple times as a positioning reference to process other surfaces, which conforms to the principle of “standard uniformity”, which is convenient to ensure the mutual position accuracy between the processed surfaces and avoid the error caused by the reference conversion , And simplify the fixture design and production work. 3) Surface A is simple in shape, easy to clamp, easy to process, and easy to obtain high surface accuracy; it has a large supporting area, which can provide good positioning and clamping for subsequent machining.
The reason why surface B cannot be used as a precision datum is that the surface is inclined (the angle with surface A is 26°), and there is no suitable machining datum, so it is not easy to clamp.
3. Selection of rough benchmark
The rough datum is the positioning surface used when machining the fine datum. It should be able to ensure that the machining allowance of each machining surface is uniform in the subsequent machining, and the shaft and other parts installed in the shell and the inner wall of the shell have enough surfaces. Clearance, and firm and reliable positioning and clamping requirements. The positional relationship between the faces of the parts and the holes is shown in Figure 3, and the structural dimensions of the parts are shown in Figure 4.
Choose to use D surface (two arc vertices) and E surface as the rough reference. Because the centerline of the R20mm arc is theoretically the axis of the C hole, that is, the axis of the rear axle after installation, everything should be aligned with the axle, so the rough datum for machining should be placed here, which is the dimension 20 in the Z direction in Figure 4 +0.4/-0.2mm.
In addition, the distance from the E surface to the axis is 21.5±0.2mm (the dimension in the X direction in Figure 4). In order to directly ensure this size, the E surface can only be used as a rough reference. The Y direction requires center symmetry.
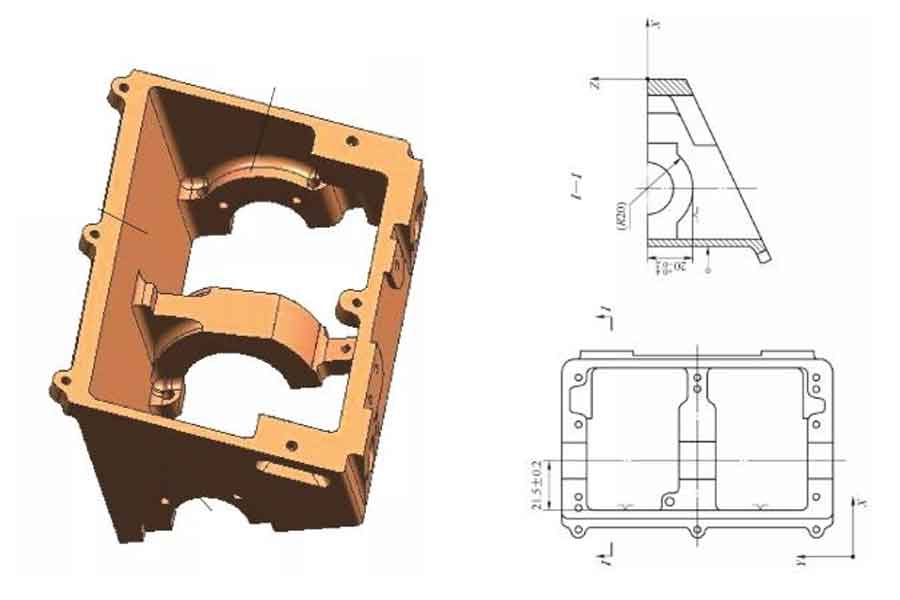
The precision of the fine reference machining directly affects the subsequent processing, which is related to whether the entire part can be processed smoothly. This step is very critical and important. Therefore, it is necessary to consider thoroughly before processing to prevent irreparable losses caused by errors found after the start of processing. After finishing the precision datum surface processing, the parts that will be affected are shown in Figure 5.
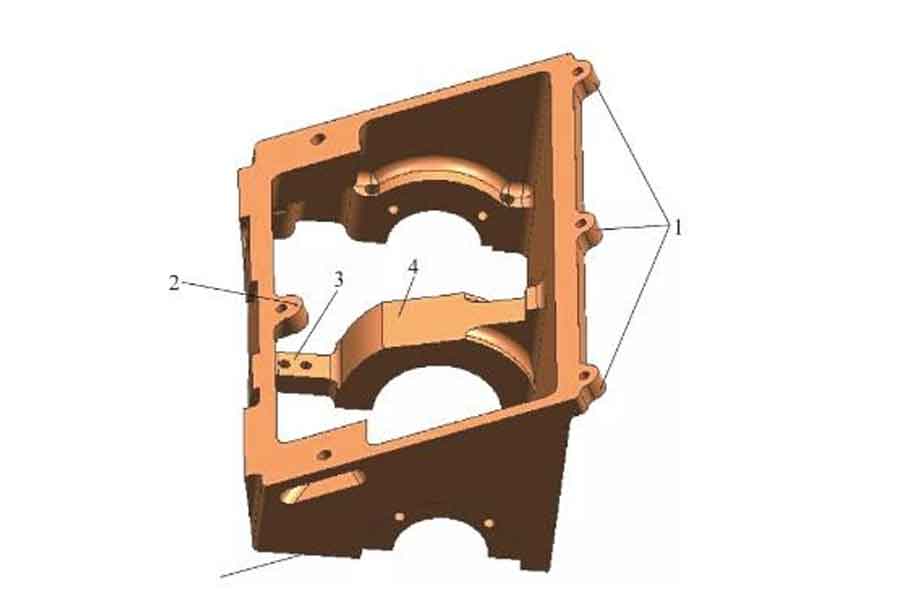
If side A is processed too much, the dimensions of 3 and 4 will become smaller, and there may even be leaks in 4; if side A is not processed enough, in the subsequent machining, the dimensions of 1 and 2 will be off. Small, it will not meet the design requirements. In actual machining, because the blank has many uncertain factors and the size is unstable, how to determine the size of the A side? How to consider the size of side A more comprehensively?
Before starting machining, arrange a fitter scribing process to draw the reference line in Figure 4, and draw the four lines 1, 2, 3, and 4 in Figure 5 at the same time to check whether their margin distribution is reasonable. And the machining size of the A side can be adjusted by the actual size of the casting to meet the allowance requirements of 1, 2, 3 and 4 at the same time. Through classification, find out the commonality, and finally determine the machining size of the A side, and prepare for the subsequent machining. The benchmark in the machining is consistent with the benchmark for the fitter’s marking, so that as long as the fitter can mark the parts, it should be able to process qualified products, and the machining allowance of the blank is sufficient. The machining equipment is a CNC milling center.
After the A surface is processed, the holes on the A surface are also made together. One clamping can ensure the perpendicularity of each hole to the A surface, and also ensure that the holes are between each other. At the same time, make preparations for clamping and positioning for subsequent machining. In the subsequent machining, the datum plane and datum hole processed in this step will be used many times, and the positioning method is “two pins on one side”, for example, this is the case for the machining of surface B in Figure 2a. In hole machining, except for the two positioning holes with a precision of H8, which need to be drilled first and then reamed, the other mounting holes only need to be drilled to ensure the size and accuracy requirements.
5. Hole machining
After finishing the precision datum, positioning hole and mounting hole, the C hole can be processed. Since the C hole is the place where the shaft is installed, the position and shape of the hole are relatively high. In order to ensure the integrity and accuracy of the hole, it cannot be processed separately, but must be processed as a whole after the No. 2 shell and the No. 1 shell are assembled. The assembled state is shown in Figure 8. During the finishing of the hole, because there is no place for clamping and positioning on the No. 2 shell, the positioning datum is switched to the No. 1 shell.
Taking the surfaces of the bosses 1 and 2 as the base surface, and positioning by the two positioning holes on the boss 1, this “one-side two-pin” positioning method can reliably and safely guarantee the size requirements. The machining equipment is a C6150A lathe. Since there is no special tooling, assembly fixtures are used instead. The assembling jig for hole machining is shown in Figure 7. The size of hole C is φ22+0.045/0mm. In order to ensure the accuracy of the hole itself, the machining should be divided into rough machining and finishing, and boring to the design size during finishing. In order to ensure that the holes at both ends are coaxial, the hole must be processed in one clamping.
The positioning size of the hole is guaranteed by the assembling fixture. Through the test run, adjusting the fixture can well ensure the positioning size of the hole. Because the precision datum has been processed, there are no positioning and clamping problems in the subsequent machining, and the machining of the rest of the parts is easily solved.
6. Concluding remarks
The machining focus of No. 2 shell is the precision datum and spindle hole. For the machining of the fine datum, as long as the correct rough datum is selected, the machining quality can be guaranteed; for the machining of the spindle hole, the dimensional accuracy and positioning dimensions are mainly guaranteed by the tool and the assembly fixture. Since the rough datum and fine datum are correctly selected at the beginning of machining, it brings great convenience to subsequent machining, simplifies the machining process, reduces the number of clamping times, improves work efficiency, and ensures machining quality.
In machining, make full use of the company’s existing high-precision CNC machine tools to achieve concentration of processes, better ensure the relative dimensional accuracy and geometric tolerances of each surface and hole on the part, and reduce the number of times and assistance for installing the workpiece. Time, reducing the number and workload of the workpiece between the machine tools, shortening the production cycle.
Through actual machining, it is proved that the machining method is correct, feasible and effective. However, there are still some problems in the machining of fine benchmarks. Due to the instability of the casting blank, the surface quality of the casting has some defects, unevenness, especially on some critical surfaces to be used for positioning, that is, the rough datum mentioned in the text. For example, the D surface used for positioning in Fig. 3 obviously has protruding points, which brings inaccuracy to the positioning of fine reference machining. In actual machining, first polish the high point to make the D surface smoothly transition, and use the method of scribing each piece of fitter to divide the machining allowance and verify whether the distribution of the blank allowance is reasonable.
This machining method is suitable for single-piece small batch production, but it is not suitable for mass production. In mass production, special fixtures must be used in order to improve production efficiency, which requires consistency of casting blanks. Therefore, in the future production, if the quality of the castings is better, the machining will be smoother and the production efficiency will be higher. Will get even greater improvement. In addition, for the machining of the spindle hole, if there is a special lathe fixture, the machining efficiency will also be greatly improved.
Link to this article: Technology And Difficulties Of Casting Shell Body Analysis
Reprint Statement: If there are no special instructions, all articles on this site are original. Please indicate the source for reprinting:https://www.cncmachiningptj.com/,thanks!
 PTJ® provides a full range of Custom Precision cnc machining china services.ISO 9001:2015 &AS-9100 certified. 3, 4 and 5-axis rapid precision CNC machining services including milling, sheet metal to customer specifications,Capable of metal & plastic machined parts with +/-0.005 mm tolerance.Secondary services include CNC and conventional grinding, laser cutting,drilling,die casting,sheet metal and stamping.Providing prototypes, full production runs, technical support and full inspection.Serves the automotive, aerospace, mold&fixture,led lighting,medical,bicycle, and consumer electronics industries. On-time delivery.Tell us a little about your project’s budget and expected delivery time. We will strategize with you to provide the most cost-effective services to help you reach your target,Welcome to Contact us ( [email protected] ) directly for your new project.
Link to this article:Technology And Difficulties Of Casting Shell Body Analysis
Reprint Statement: If there are no special instructions, all articles on this site are original. Please indicate the source for reprinting:Alloy Wiki,thanks!^^


