Why use inconel 718 to manufacturing aircraft parts
|
A long time ago, people began to use broaching methods to process tongue and groove on gas turbine disks. The blade is fixed on the turbine disk through a tongue and groove. However, broaching will cause changes in the structure of the surface and underlying layers of the turbine disk, which will affect the fatigue resistance of the wheel. |
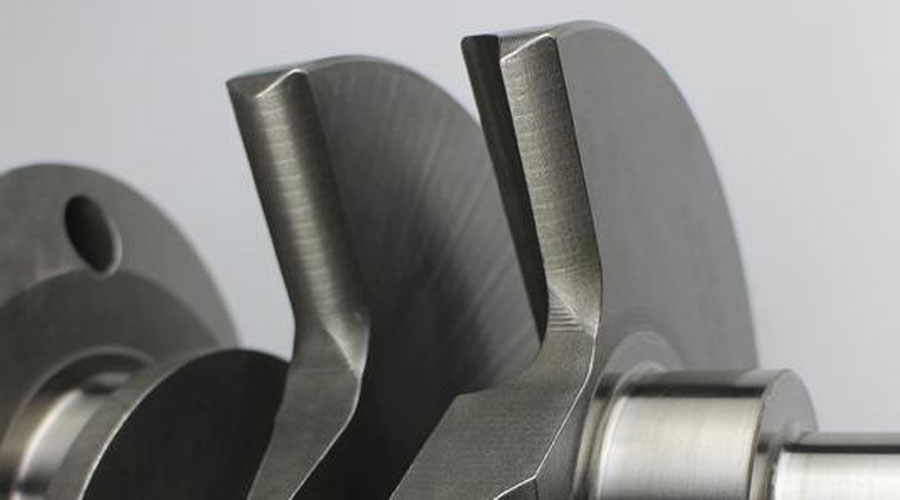
Therefore, in the optimization design of broaching process, it is very important to draw a reliable and quantitative metallographic structure diagram of the tenon groove processed by broaching. In this article, we have used optical microscope inspection and scanning electron microscopy to analyze the metallographic structure of the surface and subsurface layers of the tenon grooves of the Inconel-718 alloy disk of industrial gas turbines. The focus is on studying the characteristics of defects caused by broaching tenons and grooves on the surface and underlayer of the wheel. At the same time, the research also found the size of the raw materials γ “, γ ‘and δ on the surface of the tongue and groove. When using the material-based FEM model to predict the fatigue life of the wheel disc, it is necessary to input these important characteristic parameters of the metallographic structure. In the study of organizational structure, we found defects such as scratches and distortions. Subsequently, we compared the characteristic parameters (size and shape) of these defects with the design standards given by the gas turbine manufacturer. In addition, the areas affected by broaching and The comparison of the original materials shows that the volume fraction of δ grains has obvious changes. These changes are related to the frictional heat generation during broaching. Finally, by comparing the original materials, we have compared the microstructure hardness evolution of the metallurgical structure on the broaching surface. The effects of changes were studied.
Inconel-718 alloy is a Ni-Fe-Cr high temperature alloy invented by the International Nickel Corporation in the 1950s. This is a precipitation hardening alloy that can exhibit high yield stress and strong resistance to fatigue and creep. Because of its high oxidation resistance and high strength in high temperature environments, Inconel-718 alloy is widely used in the aerospace industry, especially as a material for gas turbine engine wheels. Generally speaking, the wheel and the blade are connected together by a longitudinal tree-shaped tenon, and the broaching process is the key to machining the longitudinal tree-shaped tenon slot. In general, everyone’s concern is the effect of temperature and tension on the change in grain size during hot deformation. Broaching will also cause changes in the metallographic structure of the surface and underlying surface of the wheel, which will affect the fatigue resistance of the wheel. However, in the literature, there are few papers on broaching of Inconel-718 alloy wheels Qualitative and quantitative analysis of changes in microstructure.
The purpose of this study is to describe and quantify the metallographic structure of the surface and underlying surface of the longitudinal dendritic groove of the Inconel-718 alloy wheel. In particular, the description and quantitative analysis of the defects caused by the broaching process on the surface and lower surface layer of the wheel disc were recorded, and the grain size and grain characteristics of the machining area were studied.
Experimental Method
We intercepted part of the Inconel-718 alloy wheel for research (Figure 1). As shown in Figure 2, we use the method of EDM to take metallographic samples from the first, middle and tail of the middle tenon slot.

In order to meet the needs of metallographic analysis, after the sample is fixed, it will go through an automated process of grinding and polishing. When sanding, 320, 400, 600 and 1200 sandpaper will be used. After polishing, the sample will be polished on the MD fleece with 1 μm diamond suspension as the polishing liquid for 2 minutes. In order to be able to observe the grain boundaries with a scanning electron microscope (SEM), the sample will be etched in an oxalic acid solution at a voltage of 4V for 20-40 seconds. In order to capture the characteristics of γ ‘and γ’ with high definition, the sample needs to be galvanic etched in a voltage 10V solution (8ml H2SO4 and 100ml H2O) for 20 seconds, and a scanning electron microscope equipped with a scanning emission gun (FEG) .
When analyzing defects with SEM, the sample needs to be electro-etched in a voltage 3V solution (5g CuCl2, 100ml HCL and 100ml ethanol) for 10 seconds. Use the height difference method to get the size of the grain. Use ASTM to get the volume fraction of different grains: E562 assumes that the area fraction is equal to the volume fraction. The size of different grains was measured with Clemex image analysis software. In order to obtain a representative statistical result, at least 6 metallographic diagrams must be used to determine the size and characteristics of different grains.
At least 5 samples of each sample should be taken for Rockwell A hardness measurement, and then an average value should be calculated for each sample. In experiments, the distance between scratches is usually greater than 5 times the diameter of the scratches. In order to compare with the hardness values in the literature, Rockwell A hardness values need to be converted into Vickers hardness, ASTM: E140.
Defect Analysis
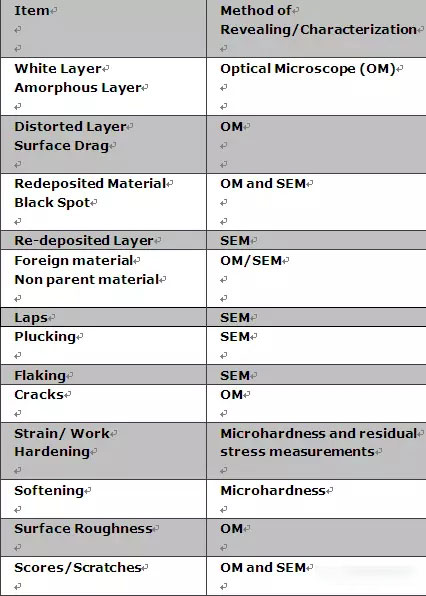
In this study, we systematically analyzed the defects in the middle row of tongue and groove. More precisely, we observed and quantified the beginning, middle and end of broaching. Table 1 shows the different types of defects included in the longitudinal dendritic grooves of broached Inconel-718 alloy wheels. It should be mentioned that in the research samples, we did not observe defects such as white layer, non-menstrual layer, secondary biomass, black spots, re-stacking, foreign matter, and cracks.
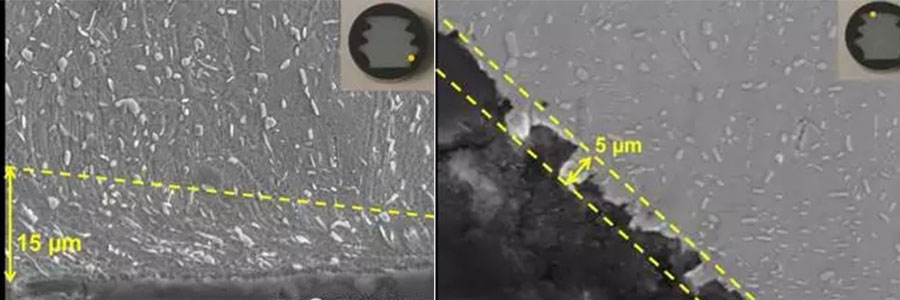
Figures 3 to 6 show some of the observed defects. Figure 3 shows the erosion, such as the small holes that appear on the machined surface. Indeed, scratching is the most common surface defect. Everyone knows that the Inconel-718 alloy hardens mechanically due to its rapid mechanical hardening during processing. Different tool materials and broaching conditions, the surface of the alloy will have increased side wear, pitting and punching. However, in all the research samples, the maximum acceptable depth of erosion was smaller than designed. Similarly, as shown in Figure 4, the image of the twisted layer is shown. In this layer (7 μm wide), the δ phase has a special arrangement. This phenomenon is easily found at the top of the tongue and groove, which may be related to the stress caused by broaching in this area.
The roughest surface of the tongue and groove (Figure 5) is at the beginning and end of broaching. Similarly, as shown in Figure 6, there is a defect called incomplete material separation, similar to material fracture, but did not fall off the surface of the wheel. This phenomenon exists in all samples. Such defects have a maximum length of 25 μm, and their characteristics (size and morphology) vary. This defect stems from the quality of broaching, and its effect on the life of the roulette remains to be further studied.
Link to this article: Why use inconel 718 to manufacturing aircraft parts
Reprint Statement: If there are no special instructions, all articles on this site are original. Please indicate the source for reprinting:https://www.cncmachiningptj.com/,thanks!
 PTJ CNC shop produces parts with excellent mechanical properties, accuracy and repeatability from metal and plastic. 5 axis CNC milling available.Machining high-temperature alloy range inclouding inconel machining,monel machining,Geek Ascology machining,Carp 49 machining,Hastelloy machining,Nitronic-60 machining,Hymu 80 machining,Tool Steel machining,etc.,. Ideal for aerospace applications.CNC machining produces parts with excellent mechanical properties, accuracy and repeatability from metal and plastic. 3-axis & 5-axis CNC milling available.We will strategize with you to provide the most cost-effective services to help you reach your target,Welcome to Contact us ( [email protected] ) directly for your new project.
Link to this article:Why use inconel 718 to manufacturing aircraft parts
Reprint Statement: If there are no special instructions, all articles on this site are original. Please indicate the source for reprinting:Alloy Wiki,thanks!^^


